Tuesday, March 27, 2012

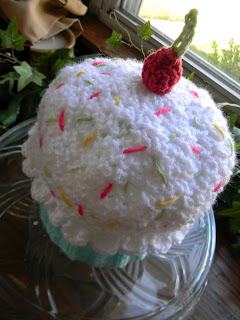
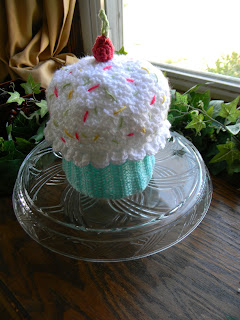
With a Cherry on Top, Sweet Little Cupcake

This sweet little design had been on my mind since the customer placed the order, I was very excited to design my first cupcake. Though when it came down to the time to sit there with the yarn in my hands, the actual design was still unknown. The customer had told me her desired colors, that she wanted sprinkles and a cherry accent and that was about it. As I gather the colors and got my set up all ready with my hooks, needles, and scissors, I began to get very excited. One of the big reasons is that the color the customer had desired was a unique color so none of my modern yarns matched and I had to go searching through my vintage yarn stash. This stash was discovered almost a year ago in a nice older ladies attic, she did a little crafting with different yarns but really just loved to buy it. She had so many "banana" boxes full of different retro colors and sold them to me for $10 a box. What. A. Steal! I don't always get to use this yarn because a majority of it can only be used for accents, the quality isn't consistent or soft enough for base hat yarn. There are a few colors though that are perfect for base hats and this Blue/Aqua/Teal was JUST what I was searching for!

The cherry was made with Cotton yarn, it had just the right stiffness that I was look for. I wanted the Cherry to sit like a real cherry would on the top of the hat.


Sprinkles were added with yellow, green and pink. The pink was another from the vintage stash, they just don't make the saturated colors as bright as they used to. 

I just love the way this hat looks worn, it really has a nice amount of stretch and room in the hat. My prediction would be that they could get multiple years out of this style of hat.


These Coffee Cozy's are another great design that I got to do this week. It was my first time using cotton yarn and I found that it was really fun and easy to work with. Cotton yarn is really great if there is going to be heat or lots of washing involved. It is what is traditionally used for making washcloths. This customer is changing all of her cups in her house including coffee cups over to Mason jars and using a lid attachment called Cuppow(?). So she needed a Cozy for their jars for decoration and functionality. She also loves vintage fabrics and embroidery, so I asked her to share her favorite prints and I did my own rendition of the pictures she sent me. I just love how these came together, very sweet and I really enjoyed freehand stitching the designs. There are button closures on the Cozy's so that they can be a custom fit on the jar. I also added into her order a complimentary matching washcloth. It was my first one so I'm excited to see how it cleans and if it survives actual use! :) If it does well I plan on making children character washcloths or washcloth puppets! :) 


Thank you for checking out my blog and my straight from my heart designs. If you'd like to follow me on facebook check me out at https://www.facebook.com/CDbyNicole

With a Hook and a Prayer, Crocheting with Love from Me to You,
Many Blessings,
Nicole

Thursday, March 22, 2012

Spring! Adorable Crochet SPRING Hats!

Spring is here and in come some very spring inspired hats! Each of these hats came out so sweetly and easy off my hook. I love picking up the yarn and hook and not really having to think about how I am going to make a specific design. These hats were definitely in that category, they were a bunch of fun to make and I really enjoyed seeing them come to life on my hook!


 Little Baby Chick
Hatching from her Egg
All ready with her cuteness with her small pink bow!!
I loved making the egg shell like it was cracking open to reveal this very sweet little Chick!


Next up is this long eared bunny with soft pink ears and done in a beautiful Cream color. 
Bunnies are one of my favorite animals so this design was very easy to come up with.


Simple.
I love black and white designs and this shade of yellow really brought this 
Bear hat together perfectly.
I just love how sweet this little bear with flower accent came together!


So with Spring clearly on it's way here in Northwest PA, getting to start out this beautiful season with these adorable hats is such a blessing. May you enjoy looking at these designs as much as I did making them.
Even though Spring just started it's never too early to start thinking about your Christmas/Fall 2012 ordering season, on my page on facebook fans have already started joining the list :) Go to:
Check out the "Note" Ordering Policy to see how you can get your own Custom Design by Nicole Hat!

Tuesday, March 13, 2012

Easter Egg Blessings

Last year I started this Easter Egg Blessing tradition for our family on Easter Morning. Letting my children know how much of a blessing they are to us is very important to my hubster and I. So coming up with this fun activity for Easter Morning was a perfect fit for our family. A few days before coming up with this idea I came across the history behind passing out Eggs at Easter time. We now pass out eggs full of sugar or made from sugar which is far from the original meaning of the Easter Egg. In the church Easter morning people would bring their eggs that were dyed Red for the blood of Christ and have them blessed then pass them out to their family and friends. The egg is to remind us of the new life that is given to us with Christ's sacrifice on the cross. 
For me I love teaching my children at every opportunity that I can, so I am constantly scouring books, magazines and internet looking for fun trivia about holidays or fun activities. After learning the original start of giving out Eggs it got my gears turning for how I could relate this to my kiddos. Below are some of the images of Easter morning 2011 with my Family and their Blessed Eggs. 


How to Make them:
Eggs
Butter Knife
Soap
Hair Dryer
Paint Pens
Hot Glue
Glitter
Small Pieces of Paper


I took the Egg and used THIS technique to empty it. Then I used a hair dryer to speed up the drying time, I have little patience when it comes to coming up with ideas. After it was dried out I started to use the Paint Pens and did differant designs on each egg, then wrote their names on each egg. I then took a piece of paper and wrote a blessing for each child, my Abagail's read something like this:
Abagail,
You are Blessing number 1 and as we were 8 years ago
we are truly thankful each day that we get to 
see your smile.
Love,
Momma and Daddy


They really enjoyed taking their egg out of the basket and getting to crack it open, they were a little nervous at first thinking that it had the eggy parts still inside.


So excited to see what their blessing would say!


As you can see in this shot of Duncan, after writing the blessing I rolled it up and put it in the hole that was made for emptying the egg. Then I used Hot Glue to close the hole and dipped it into the glitter on both ends to make it look on purpose :)


My kids enjoyed this activity so much that I made more Blessing Eggs for my Mother's of Preschoolers(MOPS) group. It made a great Icebreaker for our group as I put a blessing of how this group has been a blessing to each of us. The ladies really enjoyed cracking them open and reading aloud the beautiful blessings.


As Easter draws nearer I am beginning to think of what I am going to place in their Blessing Eggs and it really makes reflect on how blessed our family is. May this activity be cherished by your family too, as it has been ours.


Many Blessings,
The Pearsall Family


Monday, March 12, 2012

Leprechauns, Shamrocks, and Rainbows

Love. My. Job!
Being an Army Momma of 4, it was so hard to find that perfect job for our family without sacrificing the parent time that we felt our kiddos need. Witnessing all of the hard work pay off is such a blessing for our family and I get to work from home. Our schedules and unexpected issues make my turn around rate vary so those waiting on my order list are very treasured for their patience. I'm very thankful for each and every order I receive and feel blessed to get to work with so many wonderful people all around the country. 
I get the chance to work with amazing people creating a design that they've got in mind. These next few designs are just a few of them from the past couple weeks.


Little Leprechaun, so full of St. Patrick's day spirit, and was so much fun to make! This was a design that I just picked up the yarn with no real plan, just going with the flow of the yarn. I made the "belt" then sewed it on then making the "buckle" and attaching it. Love how neat this looks and can't wait to see the special little one in this design! 


This is a "Bella" hat, my daughter Bella inspired this design when I first started creating hats and the name stuck, done in greens and sparkle yarn. The Shamrocks were added for a more festive look and the 33 was hand stitched for the little girl's favorite Erie Otter Hockey player. I like how the two greens really look fresh and sweet. This design is one of my favorites!


Rainbow Flower Clip
Done on a barrette clip and sewn on for durability. I love the way this design came out and is super cute! This can be worn on a hat or in the child's hair, everyone loves RAINBOWS :)


These are rainbow bracelets made for a birthday party favor. Each bracelet has it's own colored button for a custom fit. I ran out of this yarn (above) and had to use a differant color (below), they were really fun to design and make! My kiddos are now requesting ones for their parties! 


Bag Full of Rainbows, don't we all wish we could have one of these!??!! 

Each one of these designs came straight from my heart and I just love all of the bright colors. Again such a blessing to work with such wonderful people to create such sweet designs! 

Many Blessings,
Nicole

With a Hook and Prayer, crocheting with Love from Me to You!

Home-Made Silly Putty, Kiddos LOVED it!

Silly Putty, we will only use home-made from now on!
At first when I pinned this idea, I was like no way, then my kids seen it and the rest is history. Our last pinterest-inspired day tried out this awesome recipe and I couldn't believe how simple it was. This home-made recipe really came together mess free and produced so much laughter that filled the day to the max!
Here is all you need:

Liquid Starch 1/2 cup
1 bottle of Glue
Glow in the Dark Paint 1.5oz
Any color acrylic paint .5oz

**Note that the glow in the dark paint is actually fabric paint, but that is all our local store had. I went out on a limb that it would work the same and it did!**

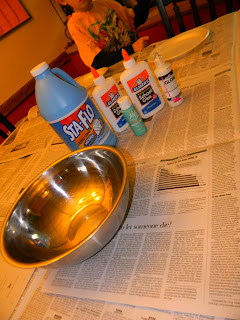
We put down old newspaper to protect the table, I was anticipating that this recipe was going to be way more messy than it actually was! 

The glow in the dark paint and the Acrylic paint were mixed together then we added the glue. The kids used the "spreader" from kids plastic silverware to stir the mixture.

Next we added the liquid starch, which then I used my hands to mix it(so no pics). You'll find that there is no exact amounts of what will work so as you are mixing so if it is too:
Sticky  =  add a little Starch
Stringy  =  add a little more glue

The kids and I were amazed that 3 liquids made a solid, so when my hubster came home he gave us a science lesson! YAY! So here it is for the rest of you:
Starch is like little bitty pieces of sand and even though it is a liquid when you put glue in it, the glue will grab a hold of those pieces of sand and keep them together. Like when you pour water onto sand and it clumps up, the glue keeps together the starch and the starch pulls the moisture keeping it from drying out as quickly.
SOOOO neat and an awesome impromptu lesson!!!


Here is our finished product, Silly Putty, a solid!!! It is cool to the touch, slightly wet feeling, stretches, and glows in the dark. The more you play with it the drier it gets, then when your done sit it on the plate for a bit and it will flatten out and the moisture comes back! Ooooo and the newspaper that was put down because I thought it was going to be a huge mess, came in quite handy for the kids to use for transfer fun. Yes, home-made silly putty still does the newspaper transfer!!!

 
The addition of the Glow in the Dark paint added yet another fun usage to the silly putty!!! Though you could just add all color paint but then the kids would have HOURS of playtime. Our kiddos went from this lamp to our dark bathroom for HOURS, back and forth! It sure was very neat to see their excitement in something that they made and were having such a blast with.


This is my hilarious Miss Bella, who just loved this rainy day craft! Pinterest is such a fun family time tool that we all enjoy getting great ideas from, now including home-made silly putty!!! We placed their portions of silly putty into ziploc bags to extend the use of their new favorite toy. The pin we mentioned before links you to this blog , a group of awesome Momma's with great ideas and recipes. I hope you add this to your rainy day busy box of ideas for you and your kiddos to try out! This will now be a staple in our home and we look forward to using it for Connor's Dino Bash Birthday Party!!! :) 

Blessings,
The Pearsall Family

Thursday, March 8, 2012

Pin-Spiration Rainbow Cupcakes

Just about everyone I've chatted with or introduced to LOVES pinterest and this includes me. So many wonderful ideas and inspirations that you can keep so nice and tidy on your boards. Though for me, once I pin something I become overwhelmed with the urge to go out and complete it. Some of the pins have more of a pull than others but each idea gets stuck in my head like a post it note. For valentines day I just simply typed into the search box "valentines" and tons of wonderful ideas popped out at me. My kiddos were right by my side as I pinned their favorite ones. It was such a fun moment with my kids, which sparked our creative juices as a family.


My girls just love to sit next to me as we go "pinning" and fill their little brains with all of these neat ideas. When we have a rainy day like today, it was perfect to pull up our boards and just pick out the ones that have been calling our name. Off to the store we went and home we came with the supplies for the different "pins" that we were going to recreate!!! The one I am sharing today is the Rainbow Cupcake, perfect for this   Momma of 4 who doesn't have a passion for baking. It's quick and fun and no excessive measuring :) 


We picked out our favorite brands of Cake Mix and Frosting.


These heavy Golden foils were perfect for this rainbow cupcake. I had actually got these on clearance for .25 right after Christmas at our local Giant Eagle, I had forgotten about picking them up. So when I went searching in my cupboards for wrappers, I was pleasantly surprised! Quite perfect for the pot of gold at the end of the rainbow!!!


I made up the cake mix in a big bowl to the exact directions on the box and then separated them into 4 separate smaller bowls.


Using food color gels, for more vibrant color, we picked out the colors that the kiddos wanted. 
Orange.


Green.


Pink.


Blue.


Then placed the color the kids picked out into the cups first. 


Followed by the colors of choice, placed randomly on top of one another.


Ready for the Oven!! Baked according to the box :)


All Baked up, the kids had a blast watching them through the window of the oven. This was definitely a "light ON" the whole time baking venture!


These Golden Foil Wrappers really got the kids excited, we waited semi-patiently for them to cool enough to be able to frost them. They were still a tad warm when the frosting went on and everything was A-Okay :)   


White Frosting with yummy crystal crunchy sprinkle accents! Perfect for our "clouds" on the top of our "rainbow" with the "pot of gold". 


Sliced on right down the middle so that you could see how neat the inside looks. You could put the different colors in more deliberately and make some very neat designs. This "damaged" cupcake was quickly spotted as soon as the hubby walked in the door and was "properly disposed of" LOL!!! The kiddos were so excited to try them that when daddy ate this sliced in half one, they were in shock! :)


This "pin" was so much fun to recreate and the smiles on my kiddos faces during the whole process are priceless. Even better though were the "happy plates" our kiddos had eating non-kiddo food(sooo tired of "kid food" as the hubby and I call it). They all raced to eat all of their delicious food and waited patiently for everyone to get done. Then enjoyed their tasty treats with HUGE smiles on their faces. Such a Blessing!